You usually discover a microphone problem at the worst possible moment. The meeting room opens, faces appear, someone starts the agenda, and then the chat fills with some version of “You’re muted,” “We can’t hear you,” or “You sound underwater.” In a casual catch-up, that’s annoying. In a telehealth consult, client demo, online class, or webinar, it can derail the whole session.
When searching “how to test microphone,” one often finds the same shallow advice: check the mute button, record your voice, maybe restart the laptop. That’s useful, but it misses what matters in professional calls. You don’t just need a mic that works. You need one that stays clear in a browser, behaves properly in an encrypted meeting, handles movement, rejects room noise, and doesn’t fall apart when you switch devices.
Why a Quick Mic Test Can Save Your Meeting

Two minutes before a telehealth appointment starts is a bad time to learn that Chrome lost microphone permission after an update, or that the meeting platform switched back to your laptop mic instead of your headset. I see that exact failure pattern before patient visits, client briefings, and webinars where one audio issue can throw off the first ten minutes and make the whole session feel less controlled.
A quick mic test prevents that scramble. It also catches the problems that a basic voice recorder test misses, especially in encrypted browser-based meetings where the microphone can work at the system level but still fail inside the actual platform you plan to use.
That matters more in regulated and high-stakes calls. In telehealth, legal consultations, and internal meetings with sensitive content, poor audio is not just awkward. It can force repeats of private information, delay care, disrupt documentation, or push a host to switch devices under pressure.
What a fast test actually protects
A short microphone check reduces risk in a few specific ways:
- Professional confidence: People judge the opening minutes quickly. If audio fails at the start, it can undercut trust before the conversation even settles in.
- Meeting continuity: A wrong input device or blocked browser permission can turn a 30-minute session into ten minutes of troubleshooting and twenty minutes of rushed discussion.
- Privacy and compliance discipline: In HIPAA-aware and other secure meeting workflows, the goal is not only to be audible. The goal is to confirm the right device, in the right room, through the right app, before sensitive conversation starts.
One practical rule matters here. Test the microphone where the meeting will happen. Use the same browser, the same headset, the same room, and the same conferencing platform. That is the only check that reflects real call conditions.
If you host confidential client calls, telehealth sessions, or multi-speaker webinars, a casual “testing 1-2-3” is too shallow. A short pre-call routine, paired with clear virtual meeting best practices, helps you confirm audio, room noise, permissions, and screen-sharing readiness before anyone important joins.
The key trade-off
The trade-off is speed versus certainty.
A system test confirms that the microphone turns on and captures sound. A platform test confirms that participants will hear you clearly inside the meeting app, with the browser permissions, encryption settings, device selection, and noise conditions you will use. For professional calls, the second check is the one that prevents last-minute surprises.
The Universal 60-Second Mic Check on Any Device
Five minutes before a telehealth appointment or a webinar, audio problems rarely come from one dramatic failure. They usually come from one small mismatch. The wrong input is selected, browser permission was denied earlier, Bluetooth grabbed the mic, or your headset is muted on the cable.
That is why a fast mic check works best when it follows the same order every time. Change one thing, test it, and keep going.
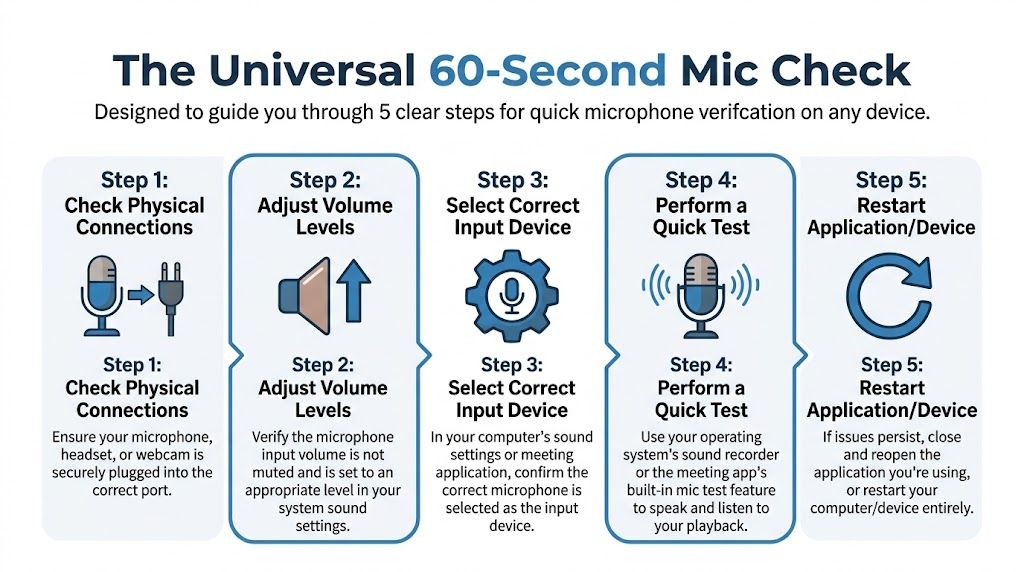
Start with the physical check
Begin with the hardware before opening settings menus. It is faster, and it catches a surprising number of failures.
- Check the connection. Push the USB plug in again. Reseat the headset jack. If it is Bluetooth, confirm it connected as a microphone and headset, not output only.
- Look for the mute switch. Many headsets have an inline mute button or a boom arm that mutes when flipped up.
- Pick one microphone. If your laptop, webcam, monitor, and headset all offer mic input, choose one on purpose.
If you are preparing for a client call or remote appointment, this quick check fits well with a broader teleconference call setup checklist.
In a browser
For browser-based meetings, test in the browser you will use for the call. Click the padlock icon near the address bar if needed and confirm microphone access is allowed. Then speak in your normal meeting voice and watch the input meter.
The meter gives you three useful clues right away:
- Meter moves, but people still cannot hear you later: The browser sees sound, but the meeting platform may have a different mic selected.
- No meter movement: Permission is blocked, the mic is muted, the wrong device is selected, or another app is holding the microphone.
- Weak movement: The mic is too far away, input level is low, or the wrong microphone is active.
Speak at your normal meeting volume, not your test voice. People often talk too loudly during setup, then sound faint once the actual meeting starts.
On Windows
Windows gives a quick pass or fail.
Open Settings > System > Sound > Input. Select the microphone you want and speak while watching the input level meter. If the bar moves, Windows is receiving audio. If it stays flat, the issue is usually device selection, mute status, or privacy settings.
For a better check, do three things:
- Use the built-in input test: Speak a full sentence so you can hear level changes across normal speech.
- Adjust input volume: Raise it if the meter barely reacts during normal speaking.
- Watch for clipping: If the meter jumps to the top during ordinary speech, lower the input before the meeting.
For encrypted meeting platforms and secure browser sessions, this matters more than people expect. A mic that barely passes a Windows test can still sound thin or unstable once noise suppression and echo control kick in inside the conferencing app.
On macOS
On a Mac, go to System Settings > Sound > Input and choose the microphone. Speak while watching the input level indicator. If the bar responds, the Mac hears you.
If it does not, check Privacy & Security > Microphone and confirm your browser or meeting app has permission.
One Mac problem shows up constantly in support tickets. Bluetooth headphones connect for listening, but macOS keeps the built-in mic selected for speaking. Always verify both input and output before you join.
On iPhone and Android
Phones are simple to test because they already include recording tools.
Use Voice Memos on iPhone or the default Recorder app on Android. Record a short clip and play it back. If the recording sounds clean, the phone microphone is probably working, and the problem is more likely in app permissions, Bluetooth routing, or network conditions inside the meeting app.
For mobile checks:
- Hold the phone naturally: Do not cover the bottom mic port with your hand or case.
- Turn off Bluetooth once: That quickly tells you whether a wireless device is taking over input.
- Test in the same room you will use for the call: HVAC noise, hallway sound, and room echo matter more on mobile.
If your phone recording sounds muffled, crackly, or inconsistent, start with these easy at-home fixes for iPhone microphone issues.
Use a real sentence, not a fake test phrase
“Testing 1-2-3” does not tell you much. It is too short, too predictable, and too limited in sound range.
Use one complete sentence at normal volume instead. Then say another one slightly softer, and one while turning your head a little. That quick pattern reveals muffling, weak pickup, dropped volume, and poor mic placement much faster than counting.
For professional calls, use words you might say in the meeting. A webinar host can test with an intro line. A clinician can test with a standard greeting. A legal or healthcare user on a secure platform should also listen for whether names, numbers, and consonants stay clear, because those details are often the first thing to get blurred in compressed or noise-processed audio.
Fixing the Most Common Microphone Problems
A bad microphone setup usually fails in one of four ways. The mic does not appear at all, it appears but sends no sound, the audio breaks up, or the voice sounds dull and distant. The fastest fix is to match your symptom to the right check instead of changing five settings at once.
That matters more on professional calls than casual chats. In telehealth, legal consults, encrypted client meetings, and webinars, a mic that works "most of the time" is still a problem if it cuts out during consent, medication details, or audience Q and A.
When your mic isn’t detected
If the microphone does not show up in the app or operating system, check the full connection path in order. Start physical, then move to software.
- Reconnect the device: Unplug and reconnect USB microphones, adapters, and wireless dongles.
- Try a different port: A failing or underpowered USB port can make a good mic look dead.
- Check system and app permissions: If access is blocked, the meeting app may act like no microphone exists.
- Close other apps that may be using the mic: Recorders, browser tabs, and other meeting tools can lock the device.
- Restart the device: This often clears audio routing problems after updates, sleep mode, or docking changes.
If the microphone appears but the room is echoing or feeding back during browser-based meetings, fix the acoustic issue before replacing hardware. These ways to stop echo on mic cover the common causes.
When the mic is detected but nobody hears you
This usually points to the wrong input, a mute switch, or app-level audio control.
Use this sequence:
- Check the meeting app’s selected input. Many platforms do not follow the system default after you plug in a headset or dock.
- Check for a physical mute control. Inline headset buttons and USB mic mute pads get hit all the time.
- Raise input level a little. Very low gain can sound like silence, especially with soft voices.
- Record a quick local sample. If the recording sounds normal, the microphone is fine and the issue is inside the meeting app, browser, or security setting.
- Leave and rejoin after permission changes. Some encrypted conferencing tools do not refresh microphone access until you reconnect.
If the input meter is moving but other participants still hear nothing, stop adjusting the microphone itself. Focus on app selection, browser permission, or account-level conferencing settings.
When the audio sounds garbled, robotic, or choppy
This problem often gets blamed on the mic, but the actual cause is usually unstable audio routing or call processing. Bluetooth earbuds reconnecting mid-call, a laptop switching back to its internal mic, or aggressive noise suppression inside the meeting platform can all create metallic, broken speech.
These failures show up most often during higher-stakes sessions where people switch devices, join from a dock, or move between desktop and phone. That is why a mic can sound fine in a quick recorder test but fail in a secure webinar or telehealth platform with echo control, encryption overhead, and multiple active participants.
Fixes that usually work:
| Problem | What usually fixes it |
|---|---|
| Robotic or broken speech | Leave and rejoin after choosing one input device only |
| Audio cuts in and out | Turn off nearby Bluetooth audio devices you are not using |
| Volume changes wildly | Disable aggressive auto-gain or audio enhancement settings if the app allows it |
| Works on laptop but not phone | Test each device separately before the live session, not during it |
When the audio is muffled
Muffled sound is often a placement problem. The microphone is too far away, partly blocked, facing the wrong direction, or picking up more room than voice. Built-in laptop mics are especially sensitive to distance, typing noise, and reflective rooms.
Phones add their own problems. Cases can block a mic port. Pocket lint can clog it. Hands often cover the bottom edge during calls without the user noticing. If you’re troubleshooting an iPhone, this guide to easy at-home fixes for iPhone microphone issues is useful because it focuses on the simple physical checks people skip.
What works better than random tweaking
Random troubleshooting wastes time and creates new problems. A better method is to isolate one layer at a time.
- Verify the hardware connection
- Confirm the correct input is selected
- Check microphone permissions
- Make a local recording
- Test inside the actual meeting platform you will use
- Restart only after you know which step failed
That order is reliable because it separates device faults from app faults. For professional calls, it also reduces the chance of walking into a confidential session with a mic that passed a casual test but fails under real meeting conditions.
Advanced Mic Testing for Professional Reliability
A microphone can pass a basic check and still fail in the exact moment you need it most. That happens during telehealth appointments, encrypted client calls, panel webinars, and interviews where the audio must stay clear even when you shift posture, turn to a second screen, or start sharing documents.
Professional reliability means testing for consistency, not just sound. The goal is to hear what happens when your position changes, your room starts working against you, or the meeting platform applies its own processing.
Test distance with a simple three-position check
You do not need studio gear to do this well. Use three speaking positions and compare the recording.
As noted in the DPA microphone testing method, testing at a normal speaking distance and then much closer helps reveal how a microphone changes tone, including the proximity effect common with directional mics.
Use these positions:
- Normal speaking position: The distance you would use in a real meeting. This tells you whether your voice sounds natural and clear.
- Very close position: Close enough to trigger boominess, plosives, or heavy bass if the mic is sensitive to close speech.
- Room position: Far enough away to expose echo, keyboard noise, HVAC noise, and how much of the room the mic captures.
This test gives you a practical limit. If the mic only sounds good in one narrow position, that matters for telehealth, compliance reviews, and webinars where you may need to read notes, look sideways, or speak for long stretches without babysitting the microphone.
Run a rehearsal that matches the live meeting
For confidential or regulated calls, test in conditions that match the actual session as closely as possible. A voice memo proves the microphone can record. It does not prove the browser, meeting platform, permissions, and audio processing will behave the same way during an encrypted call.
Use this sequence:
- Join a test meeting in the same browser and on the same device you will use live.
- Speak at your normal seated position for 15 to 20 seconds.
- Turn your head left and right while reading a full sentence.
- Lean in slightly, then sit back slightly.
- Start screen sharing if you plan to present.
- Listen for changes in volume, bass buildup, clipping, and room echo.
- Repeat once with your backup device.
That last step catches a lot of avoidable failures. I have seen microphones sound clean in a recorder app, then switch inputs or apply different gain behavior once the browser session starts.
One platform people use for this kind of rehearsal is AONMeetings, which runs in the browser and includes meeting and webinar features with bank-level encryption. The useful part here is not the brand name. It is the fact that browser-based, encrypted calling can expose problems that a quick local test misses.
A microphone that sounds fine in a local recording can still break down in a live browser session because the active input, permission state, or automatic gain control changes.
Check how the mic handles movement
A lot of meeting audio problems are really movement problems.
Record a short sample while sitting still, then repeat it while turning slightly to the side, glancing down at notes, and looking at a second monitor. If your voice drops sharply or becomes thin, the microphone has a tighter pickup pattern and needs more careful placement.
That can help in a noisy home office. It can also create trouble in webinars, training sessions, and remote assessments where you naturally move while talking.
Stress-test shared-room and multi-device setups
Webinars and panel calls fail in predictable ways. The host joins on a laptop, someone adds a phone for chat monitoring, a Bluetooth headset reconnects, and suddenly there is echo, doubling, or the wrong mic becomes active.
Test the full setup, not each piece in isolation.
A reliable pre-event check looks like this:
- Start on the actual host device you plan to use
- Join the second device muted and confirm there is no echo loop
- Speak from each seat if two people share one room
- Switch camera views or screen sharing while talking
- Reconnect any Bluetooth device once before the event, not for the first time live
If the audio changes during one of those transitions, you found the weak point before your audience did. That is the standard to aim for when the call involves patient information, client confidentiality, or a room full of attendees who will notice every dropout.
The Business Case for Reliable Audio
Bad audio wastes time in a way that rarely shows up on a budget line. A missed sales demo becomes a rescheduled demo. A telehealth consult runs late or gets repeated. A webinar host spends the opening minutes apologizing instead of presenting. The microphone itself may not be expensive, but unreliable audio is costly.
What you’re really paying for
When comparing tools, users often focus on the monthly plan and ignore friction:
- Meeting limits
- Separate webinar charges
- Extra add-ons for recording or controls
- Security features hidden behind higher tiers
- Time spent troubleshooting across devices
That’s why value matters more than headline price alone.
AONMeetings vs the competition
The table below compares the stated platform positioning and plan structure described by the publishers for common business use cases.
| Feature | AONMeetings | Zoom (Free/Pro) | Microsoft Teams (Free/Essentials) |
|---|---|---|---|
| Starting price | Starts from ₹179 per user per month | Varies by plan | Varies by plan |
| Meeting time limits | Unlimited meeting time on all plans | Free and paid plans differ | Free and paid plans differ |
| Webinars included | Included in all plans | Often plan-dependent | Often plan-dependent |
| Encryption | Bank-level encryption included | Feature availability varies by plan | Feature availability varies by plan |
| Browser-based use | Works in the browser with instant join links | Available depending on workflow | Available depending on workflow |
| Core collaboration tools | Screen sharing, whiteboards, document sharing, recordings | Varies by plan | Varies by plan |
| Advanced options | Breakout rooms, virtual backgrounds, meeting lock, live streaming to YouTube, multi-camera broadcast, brandable UI themes on higher tiers | Plan-dependent | Plan-dependent |
| Payments and buying friction | No contracts, no hidden fees, UPI, PayPal, card payments, 30-day money-back guarantee | Depends on vendor terms | Depends on vendor terms |
Price matters, but setup friction matters too
If you only compare sticker price, a free plan always looks attractive. If you compare what’s included for real business use, the equation changes quickly. Webinars, longer meetings, recordings, stronger controls, and encryption often decide whether a platform stays simple or turns into a patchwork of upgrades.
For a solo tutor, clinic, startup, or small training team, the value proposition is straightforward: paying for one predictable setup that includes webinars and secure meetings can be easier than starting free and discovering the missing pieces during a live event.
Cheap meetings become expensive when the audio fails during the meeting that mattered.
Answering Your Top Mic Testing Questions
How do I test a Bluetooth microphone properly
Pair it first, then confirm it’s selected as the input device, not only the speaker output. Record a short clip, disconnect Bluetooth, then record again. If the sound changes dramatically, you’ve confirmed which mic is active.
Why does my microphone sound muffled even after I raise the volume
Volume doesn’t fix bad placement. Move the mic closer, but not too close. Check for fabric, a case edge, or a hand covering the microphone port. If it’s a directional mic, speak into the correct side.
How can I tell if my browser is blocking the mic
If the operating system meter moves but the meeting app doesn’t, the browser is the first place to check. Open site permissions, allow microphone access, then reload the tab or rejoin the meeting.
What’s phantom power in simple terms
Some condenser microphones need power from an audio interface or mixer to operate properly. That power is commonly called 48V phantom power. If you bought a condenser mic and it seems dead, the mic may be fine but unpowered.
Should I test in a voice recorder or in the meeting app
Both, but in that order. A voice recorder tells you if the hardware works. The meeting app tells you if the call setup itself works. If you only do one, do the one that matches the meeting environment.
What if my mic works on one app but not another
That usually points to app permissions, browser settings, or the wrong input selected inside that app. Don’t assume apps share the same audio choice. Many keep their own device selection.
If you need a meeting platform where your microphone can be tested in the same browser-based environment you’ll use for telehealth calls, client meetings, classes, or webinars, AONMeetings is one option to evaluate. It offers HIPAA-compliant meetings, webinars included in all plans, bank-level encryption, unlimited meeting time, and instant browser join links, which makes it easier to test audio in real conditions before the call starts.